
 - Docs
Configure SSH
Obtaining your credentials
After ordering your instance from Seravo you’ll get an email which includes your credentials. It looks something like this:
SSH/SFTP:
Host: example-site.seravo.com
Port: 12345
User: example-site
Pass: 123456abcdefgh
Important: Use your own credentials instead of these. These are just an example and won’t work!
You can use these credentials to log into your website server using a console connection program that supports SSH or a file transfer program that supports SFTP. Note that Seravo only allows the use of encrypted connections and for example the insecure legacy FTP method is forbidden. As a WordPress site developer you should be familiar with using SSH and SFTP and the basics about them is not covered in our documentation.
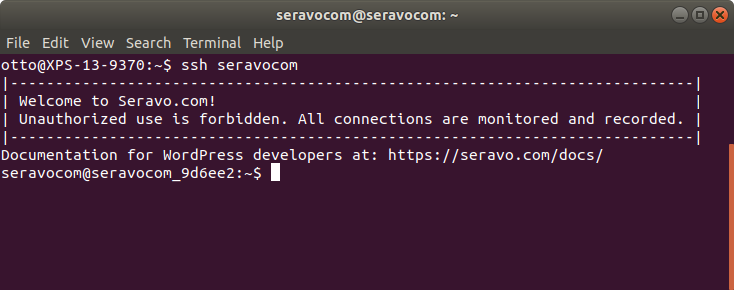
Using the above credentials with OpenSSH on the command line would look like this:
my-laptop$ ssh -p 12345 example-site@example-site.seravo.com
The authenticity of host '[example-site.seravo.com]:12345 ([185.26.50.24]:12345)' cant be established.
RSA key fingerprint is xy:xy:xy:xy:xy:xy:xy:xy:xy:xy:xy:xy:xy:xy:xy:xy.
Are you sure you want to continue connecting (yes/no)? yes
Warning: Permanently added '[example-site.seravo.com]:12345' (RSA) to the list of known hosts.
|----------------------------------------------------------------------------|
| Welcome to Seravo.com!                                                     |
| Unauthorized use is forbidden. All connections are monitored and recorded. |
|----------------------------------------------------------------------------|
example-site@example-site.seravo.com's password:
Last login: Mon Oct 29 09:58:59 2018 from 172.17.42.1
Documentation for WordPress developers at: https://seravo.com/docs/
example-site@example-site_a1b2c3:~$
Note that the first time you connect to a new SSH server it will ask you to verify the fingerprint of the server. On the first connection it is OK to accept whatever key it presents. On any consecutive connections it will use the same fingerprint. However, if the fingerprint suddenly changes, it can be a sign that there is a man-in-the-middle attack going on.
Using SSH key authentication
When frequently using SSH it can be annoying to constantly have to enter the password. To make your workflow significantly smoother as a developer, please use SSH keys to authenticate instead of the password.
Generate a SSH key pair
SSH keys use public key cryptography, which means that there is one key to encrypt, and one to decrypt. The other key is secret, and the other public. With OpenSSH, the keys are generated using the command ssh-keygen -t ed25519. Running it will generate a pair of keys which with the default settings are named id_ed25519 (private) and id_ed25519.pub (public) and placed the directory .ssh in your home directory. If you have an old version of SSH your keys might be named id_rsa and id_rsa.pub. Modern elliptic key cryptography is recommended. Check out Seravo’s Linux blog article on how to create good SSH keys.
You need to make sure you never loose or leak your private key! The public key is the one you install on remote servers you want to access using keys. The private key never leaves your own computer and is used only to decrypt challenges sent by the remote server, proving to the remote server that you are the holder of the private key.
See also Github’s article on generating ssh keys
Install your public key on the remote server
To install your public key on a remote server, the easiest way using the credentials above would be to run:
my-laptop$ ssh-copy-id -p 12345 example-site@example-site.seravo.com

Number of key(s) added: 1

Now try logging into the machine, with:   "ssh example-site.seravo.com"
and check to make sure that only the key(s) you wanted were added.
When you are done installing your SSH key, test that it works and you actually can SSH into the server without being prompted for a password.
OS X users: You can install ssh-copy-id with Homebrew:
brew install ssh-copy-id
Windows users: Install your ssh key through Putty instead. Cygwin is also a great choice for all your terminal tools (ssh, rsync, git..) under Windows.
If ssh-copy-id does not work for you, it is also possible to manually install them simply by editing the .ssh/authorized_keys file on the remote server, and add there your public key as a new line in the file.
my-laptop$ cat ~/.ssh/id_ed25519.pub
asdfasdfasdfasdfasdfasdfasdf

my-laptop$ ssh ssh -p 12345 example-site@example-site.seravo.com

example-site@example-site_a1b2c3:~$ nano ~/.ssh/authorized_keys
 # add the line 'asdfasdfasdfasdfasdfasdfasdf' at the end of the file
 # then press Ctrl+X to save and exit

example-site@example-site_a1b2c3:~$ exit # terminate connection
If you do this manually, also make sure the .ssh folder has permission attributes drwx------ and that the authorized_keys has permission attributes -rw-------.
Configuring SSH
Another typical thing developers do to make their workflow more efficient is to store their SSH remote server settings in the configuration file at ~/.ssh/config. With will remove the need to remember and enter manually port numbers, and it will also make the ssh command support tab auto-completion so there is less need to even remember the server name itself.
Add following lines to ~/.ssh/config:
Host example-site
  HostName example-site.seravo.com
  User example-site
  Port 12345
  ForwardAgent yes
Optional:
ForwardAgent yes- allows you to use your ssh credentials in the production machine to access private code from Github or Bitbucket.
Using Vagrant SSH
Keep in mind that when using use the vagrant ssh command to enter your Vagrant box, the SSH ForwardAgent is automatically enabled and your personal keys are used to access the production environment. These are used for wp-ssh-production or wp-pull-production-db. The Vagrant image itself does not contain any private SSH keys.